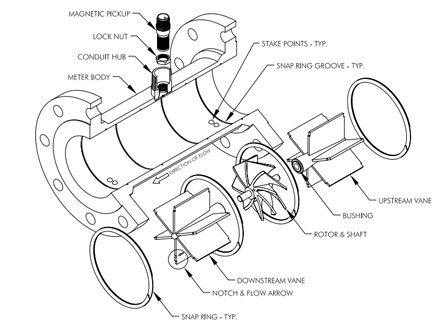
4" - 10" Installation Kit
- Remove magnetic pickp by loosening lock nut using 3/4" thin wall socket. Then unscrew from meter body. This procedure will help to prevent pickup damage during the repair procedure.
- Remove snap ring from each end of the meter body, using pick or screwdriver.
- Remove upstream and downstream vanes, tapping with soft rod if necessary to drive out vanes.
- Remove inner snap rings and rotor from body.
- Clean the meter body bore as required bringing it back to a like new condition.
- Clean snap ring grooves to allow the ring to properly seat.
Kit Installation
- Install downstream inner snap ring.
- Install downstream vane so arrow on vane corresponds with directional arrow on the meter body. The vane blade with the notch goes between the weld stake pins.
- Install outer downstream snap ring.
- Install rotor being sure the arrow is properly aligned, and the shaft seated in the vane bushing.
- Install upstream inner snap ring
- Install upstream vane, with notched vane blade between weld stake spots. Spin the rotor to allow shaft to easily enter the vane bushing. DO NOT USE FORCE TO PUSH THE VANE BEARING OVER THE ROTOR SHAFT.
- Install upstream snap ring.
- Make sure the rotor spins freely before installing the meter.
- Attach plastic calibration tag around the conduit hub and cut off excess strap length flush with tag.
- Install magnetic pickup as follows:
- Screw in the pickup by hand until it bottoms out.
- Back off 1/4 turn and tighten lock nut with 3/4" thin wall socket.


